Smart
Welcome to Yarana IoT Guru! 🌟
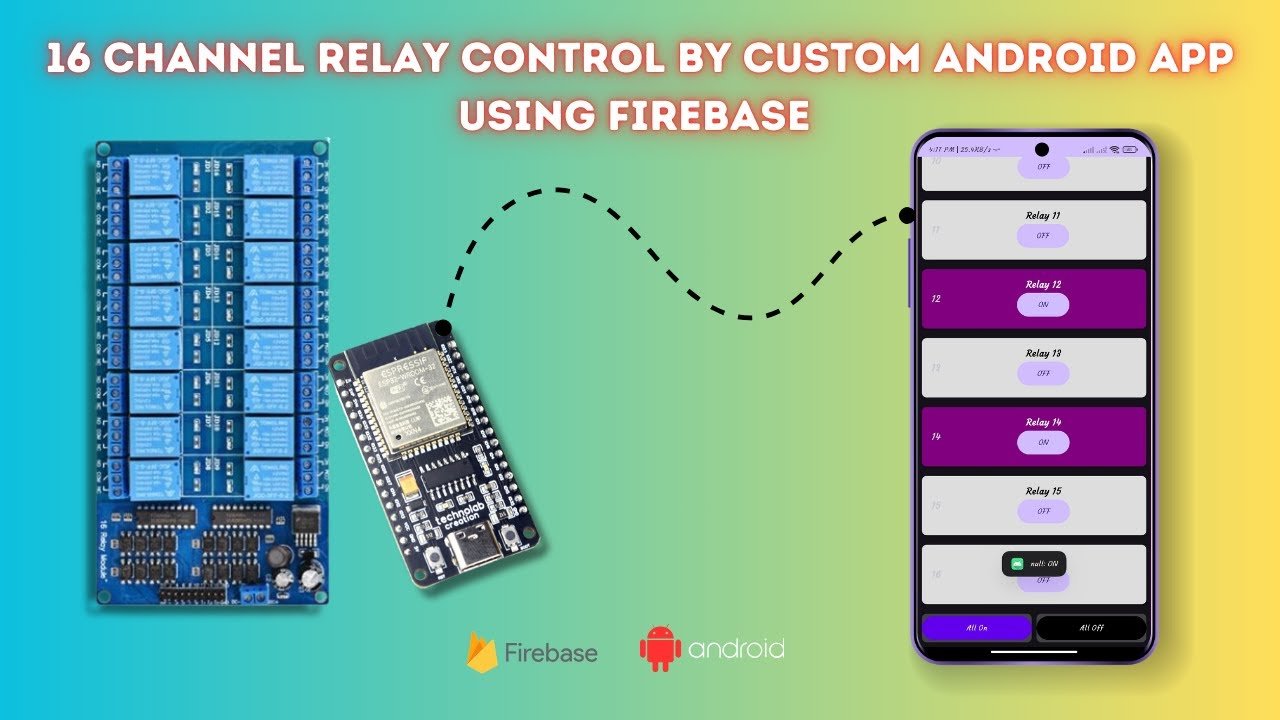
Imagine being able to control 16 different appliances in your home with a single smartphone app! With ESP32, Firebase, and an Android app, you can automate your entire home lighting, fans, and other electrical devices wirelessly.
In this tutorial, we will guide you step-by-step on how to:
✅ Control 16 relays using an ESP32 microcontroller
✅ Use Firebase for real-time relay switching
✅ Build an Android app to manage the relays remotely
✅ Create a complete smart home automation system
👉 📥 Download Complete Source Code:
🔗 GitHub Repository
🎯 What You Will Learn in This Project
✔️ Connecting ESP32 to a 16-channel relay module
✔️ Using Firebase Realtime Database for real-time updates
✔️ Creating a custom Android app for controlling relays
✔️ Automating home appliances with IoT and cloud technology
🛠 Components & Technologies Used
✅ ESP32 Microcontroller – Brain of the project
✅ 16-Channel Relay Module – Controls appliances remotely
✅ Firebase Realtime Database – Cloud-based relay control
✅ Android App (Kotlin/Java) – Sends commands to ESP32
✅ WiFi Network – Enables remote access
📌 Why Automate Your Home Using ESP32 & Firebase?
Traditional switch-based controls are outdated. With smart automation, you can:
🔹 Turn appliances ON/OFF remotely using a smartphone
🔹 Schedule devices based on time or conditions
🔹 Monitor power usage and improve energy efficiency
🔹 Make your home smarter with IoT-based automation
This system is affordable, scalable, and beginner-friendly! 🚀
🚀 Step-by-Step Guide to Building a Smart Home Automation System
Step 1: Setting Up the 16-Channel Relay with ESP32
The 16-channel relay module allows you to control multiple home appliances using low-voltage signals.
📥 Wiring Diagram for ESP32 & Relay
| ESP32 Pin | Relay Module Pin | Function |
|---|---|---|
| GPIO 4 | IN1 | Relay 1 |
| GPIO 5 | IN2 | Relay 2 |
| GPIO 18 | IN3 | Relay 3 |
| GPIO 19 | IN4 | Relay 4 |
| GPIO 21 | IN5 | Relay 5 |
| GPIO 22 | IN6 | Relay 6 |
| GPIO 23 | IN7 | Relay 7 |
| GPIO 25 | IN8 | Relay 8 |
| GPIO 26 | IN9 | Relay 9 |
| GPIO 27 | IN10 | Relay 10 |
| GPIO 32 | IN11 | Relay 11 |
| GPIO 33 | IN12 | Relay 12 |
| GPIO 12 | IN13 | Relay 13 |
| GPIO 13 | IN14 | Relay 14 |
| GPIO 14 | IN15 | Relay 15 |
| GPIO 15 | IN16 | Relay 16 |
Power Connections:
- Connect VCC of Relay Module to 5V of ESP32
- Connect GND of Relay Module to GND of ESP32
Step 2: Writing the ESP32 Code for Firebase Integration
The ESP32 will retrieve relay states from Firebase and turn appliances ON/OFF accordingly.
📥 ESP32 Code to Control 16 Relays via Firebase
cppCopyEdit#include <WiFi.h>
#include <FirebaseESP32.h>

#define FIREBASE_HOST "your-firebase-url.firebaseio.com"
#define FIREBASE_AUTH "your-firebase-secret"

FirebaseData firebaseData;
WiFiClient client;

// Define relay pins
int relayPins[] = {4, 5, 18, 19, 21, 22, 23, 25, 26, 27, 32, 33, 12, 13, 14, 15};
String relayPaths[] = {"/relay1", "/relay2", "/relay3", "/relay4", "/relay5", "/relay6", "/relay7", "/relay8", "/relay9", "/relay10",
                       "/relay11", "/relay12", "/relay13", "/relay14", "/relay15", "/relay16"};

void setup() {
    Serial.begin(115200);
    WiFi.begin("your-SSID", "your-PASSWORD");

    while (WiFi.status() != WL_CONNECTED) {
        delay(1000);
        Serial.print(".");
    }

    Firebase.begin(FIREBASE_HOST, FIREBASE_AUTH);

    for (int i = 0; i < 16; i++) {
        pinMode(relayPins[i], OUTPUT);
        digitalWrite(relayPins[i], HIGH);  // Default OFF state
    }
}

void loop() {
    for (int i = 0; i < 16; i++) {
        if (Firebase.getInt(firebaseData, relayPaths[i])) {
            int state = firebaseData.intData();
            digitalWrite(relayPins[i], state);
        }
    }
    delay(500);
}
Step 3: Creating an Android App for Smart Home Control
Now, let’s build an Android app to:
✅ Send ON/OFF commands to Firebase
✅ Retrieve real-time relay status
📥 Android Code to Read Firebase Data
javaCopyEditDatabaseReference databaseRef = FirebaseDatabase.getInstance().getReference("relay1");

databaseRef.addValueEventListener(new ValueEventListener() {
    @Override
    public void onDataChange(DataSnapshot dataSnapshot) {
        int relayState = dataSnapshot.getValue(Integer.class);
        if (relayState == 1) {
            relaySwitch.setChecked(true);
        } else {
            relaySwitch.setChecked(false);
        }
    }

    @Override
    public void onCancelled(DatabaseError databaseError) {
        Log.w("Firebase", "Failed to read value.", databaseError.toException());
    }
});
📥 Android Code to Send Relay Control Command
javaCopyEditrelaySwitch.setOnCheckedChangeListener((buttonView, isChecked) -> {
    int state = isChecked ? 1 : 0;
    databaseRef.setValue(state);
});
Step 4: Testing & Demonstration
1️⃣ Upload ESP32 code and ensure it connects to Firebase.
2️⃣ Run the Android app and control relays via Firebase.
3️⃣ Check appliance switching and verify remote operation.
✅ Congratulations! You’ve built a fully functional smart home automation system. 🚀
📺 Watch the Full Video Tutorial
🔴 ESP32 16-Relay Smart Home Control Video on Yarana IoT Guru
📢 Check out our GitHub Repo for the full source code!
👉 Download Code
📌 Frequently Asked Questions (FAQs)
❓ Can I add more than 16 relays?
✅ Yes! You can use I2C relay boards for expansion.
❓ Does this system work without the internet?
✅ No, Firebase requires an active WiFi connection.
❓ Can I schedule relays to turn ON/OFF automatically?
✅ Yes! Add time-based scheduling in Firebase.
🚀 Final Thoughts
This ESP32-based smart home system is a powerful yet simple IoT solution. With Firebase cloud integration, you can remotely control appliances from anywhere.
✅ Try this project and make your home smarter today! 🚀