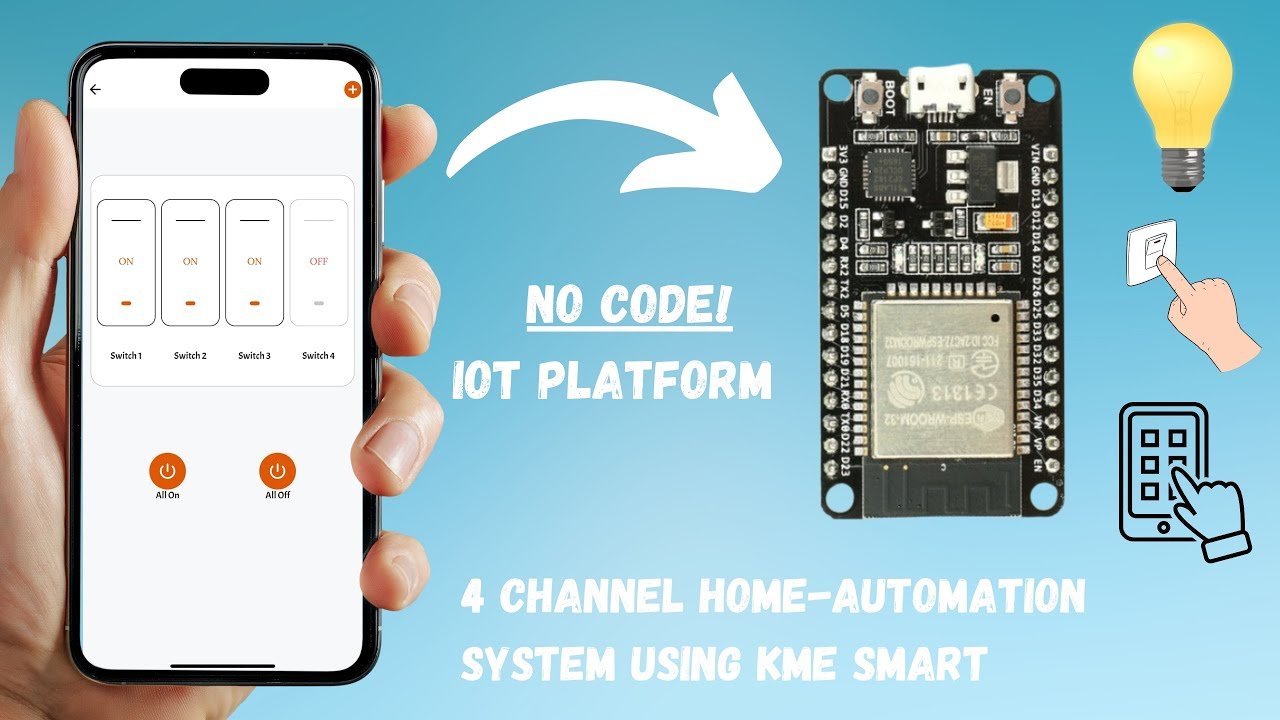
Building a Smart Home System no longer requires complex coding, expensive hardware, or cloud setup. Thanks to the KMEsmart IoT Platform, even beginners can design and deploy advanced home automation projects — without writing a single line of code!
This tutorial will walk you step-by-step through creating your own IoT-based Home Automation System using the KMEsmart No-Code Platform. You’ll learn how to:
- Connect devices like ESP32 or ESP8266
- Create a custom app dashboard
- Control lights, fans, and appliances remotely
- Use Google Assistant or Alexa for voice control
- Monitor real-time device status
Whether you are a beginner in IoT or a developer exploring rapid prototyping, KMEsmart gives you the tools to automate your environment efficiently.
💡 2. What Is KMEsmart?
KMEsmart is a No-Code IoT Cloud Platform that allows you to connect, control, and monitor your IoT devices directly from a mobile or web app.
You don’t need to know C++, Python, or JavaScript — everything can be configured visually through their online dashboard.
🔧 Key Features of KMEsmart:
| Feature | Description |
|---|---|
| 🧠 No-Code Development | Drag-and-drop interface for quick project creation |
| 📱 Mobile App Control | Control devices via Android/iOS App |
| ☁️ Cloud Connectivity | Connect ESP32, ESP8266, NodeMCU easily |
| ⚡ Real-Time Monitoring | Live device status updates on dashboard |
| 🔊 Voice Control Support | Works with Google Assistant & Alexa |
| 🔄 Automation Rules | Set triggers based on time, conditions, or sensors |
| 🛠️ Custom Dashboard | Build your own control interface easily |
⚙️ 3. Components Required
| Component | Description |
|---|---|
| 🧩 ESP32 / ESP8266 / NodeMCU | Main controller for IoT device |
| 🔌 Relay Module (2-4 Channel) | For controlling home appliances |
| 💡 Bulb, Fan, or Load Devices | To test switching and automation |
| 🔋 Power Supply (5V/12V) | To power relays and microcontroller |
| 📶 Wi-Fi Connection | For linking to KMEsmart Cloud |
| 💻 KMEsmart Web Dashboard | To create and manage IoT project |
| 📱 KMEsmart Mobile App | For remote control & automation |
🧭 4. How KMEsmart Works
Here’s how the entire IoT flow works:
- The ESP32/ESP8266 device connects to your Wi-Fi.
- Using the KMEsmart dashboard, you configure the device ID, relay pins, and control logic.
- The device automatically connects to the KMEsmart Cloud using MQTT or HTTP protocol.
- When you tap a switch on the mobile app, it sends a signal to the cloud.
- The cloud updates the device state and the relay toggles ON/OFF instantly.
It’s a perfect combination of IoT simplicity + powerful automation.
🧠 5. Why Use KMEsmart for Home Automation?
Unlike traditional IoT setups where you write complex Arduino or Python code, configure servers, and set up databases, KMEsmart eliminates all of that complexity.
Here’s why it’s ideal for beginners:
| Advantage | Explanation |
|---|---|
| 🕹️ Zero Coding Required | Build automation without programming |
| ☁️ Integrated Cloud | No need for Firebase, Blynk, or MQTT broker setup |
| ⚙️ Custom UI | Design your own control panel visually |
| 🔐 Secure Communication | Encrypted cloud-to-device protocol |
| 🚀 Fast Deployment | From setup to automation in minutes |
📲 6. Real-World Applications
| Use Case | Description |
|---|---|
| 🏡 Smart Lighting | Turn lights ON/OFF with mobile or voice |
| 🌡️ Temperature-Based Fan Control | Use sensors to trigger automation |
| 🧠 Appliance Management | Control power sockets remotely |
| 🔔 Home Alerts | Get notifications when doors or sensors trigger |
| 💬 Voice Automation | Connect with Alexa or Google Assistant |
🎯 7. What You’ll Learn in This Tutorial
By the end of this complete 4-part tutorial, you’ll learn:
- How to connect ESP32/ESP8266 to KMEsmart
- How to build a custom dashboard
- How to control appliances in real-time
- How to integrate Google Assistant / Alexa
- How to expand your system for full smart home automation
🚀 Next Step
Now that you understand what KMEsmart is and how it simplifies IoT automation, in Part 2 we’ll move ahead to:
Setting up the KMEsmart account, connecting ESP32, and configuring the dashboard for your smart home project.
🧰 1. Setting Up Your KMEsmart Account
Before we start working on the hardware, we first need to create an account on the KMEsmart Cloud Platform. Follow these steps carefully to get started:
🪜 Step 1 – Visit the Official KMEsmart Website
- Open your browser and go to https://www.kmesmart.com.
- Click on Sign Up to create your new account.
- You can sign up using your email address or Google login.
🪜 Step 2 – Verify Your Email
- Once registered, KMEsmart will send a verification email.
- Open your inbox and click Verify Account to activate it.
🪜 Step 3 – Login to Dashboard
- After verification, go back to KMEsmart Dashboard and log in.
- You’ll now see the main workspace where you can create projects, add devices, and build dashboards.
⚙️ 2. Creating Your First IoT Project
Now that your account is ready, it’s time to create your first Smart Home Project.
🧩 Step 1 – Create a New Project
- Click “Create Project” on the dashboard.
- Enter project name: “Smart Home Automation System”
- Select the device type: ESP32 or ESP8266.
- Save the project.
🧩 Step 2 – Add Your Device
- Under the project, click “Add Device.”
- Give your device a name like: “Living Room Controller”
- The system will generate a unique Device ID and API key.
- 📟 Device ID: Used to identify your ESP32.
- 🔑 API Key: Used for authentication when connecting to the cloud.
- Note these credentials — we’ll use them in the ESP32 configuration later.
🔌 3. Hardware Connections
Let’s wire up your ESP32 or NodeMCU with the relay module and connected appliances.
🧭 Required Hardware
| Component | Quantity | Description |
|---|---|---|
| ESP32 / NodeMCU | 1 | Main controller board |
| 2-Channel Relay Module | 1 | Controls appliances |
| Light Bulb / Fan | 2 | Loads for testing |
| Jumper Wires | Several | For connections |
| Power Adapter | 5V / 12V | Power supply |
⚡ Circuit Connection Diagram
| Relay Module Pin | ESP32 Pin | Description |
|---|---|---|
| IN1 | D23 | Relay Channel 1 Control |
| IN2 | D22 | Relay Channel 2 Control |
| VCC | 5V | Power Supply |
| GND | GND | Ground Connection |
💡 Tip: You can connect up to 4 relays if needed. Just assign additional GPIO pins in the KMEsmart dashboard.
🏠 Appliance Connection
- Connect the COM (Common) and NO (Normally Open) pins of the relay to your load circuit (bulb or fan).
- Make sure your AC wiring is handled carefully — use a 5V relay board and isolate the high voltage section.
💻 4. Configuring ESP32 in KMEsmart
Now let’s connect the ESP32 to your KMEsmart project.
🧠 Step 1 – Select Device Type
- In your KMEsmart Dashboard → Project Settings → Select ESP32.
🧠 Step 2 – Download Device Configuration File
- KMEsmart allows you to download a pre-built configuration script or firmware.
- You can upload this firmware using Arduino IDE or ESP Flasher Tool.
🧠 Step 3 – Wi-Fi & Cloud Setup
- When configuring your ESP32, provide:
- Wi-Fi SSID (your home network name)
- Wi-Fi Password
- Device ID and API Key from KMEsmart
- Save and upload the configuration.
Once flashed, the ESP32 automatically connects to your Wi-Fi and links to the KMEsmart Cloud — no coding required!
📲 5. Building Your Control Dashboard
Now that your ESP32 is online, it’s time to create your custom control dashboard.
🧱 Step 1 – Add Widgets
Go to Dashboard → Add Widget, and you’ll find multiple control options:
- Toggle Switch – For controlling ON/OFF relays
- Button – Instant press actions
- Status Indicator – Shows real-time device state
- Graph / Gauge – Displays live data from sensors
🧱 Step 2 – Assign Widget Actions
Each widget needs to be linked to a specific device pin or function:
- Switch 1 → Relay 1 (GPIO 23)
- Switch 2 → Relay 2 (GPIO 22)
You can also customize:
- Button labels (e.g., “Light ON”, “Fan OFF”)
- Widget colors and dashboard layout
🧱 Step 3 – Test the Dashboard
- Once widgets are added, click Save Dashboard.
- Open your KMEsmart Mobile App.
- You’ll see the same dashboard appear on your phone.
- Try pressing the toggle switch — your ESP32 relay should click, and the light or fan should respond instantly! ⚡
🧩 6. Real-Time Cloud Communication
Every time you press a switch or button, the data travels through:
- KMEsmart Cloud Server
- MQTT Protocol
- ESP32 Device
The round-trip latency is extremely low (around 100–300 ms), making it feel like instant control — even from miles away!
🚀 Up Next: Part 3
In Part 3, we’ll explore:
- Adding voice control (Google Assistant & Alexa)
- Creating automation rules & schedules
- Monitoring real-time device data
- Expanding to multi-room smart home systems
🎙️ 1. Integrating Voice Control with Google Assistant and Alexa
Smart homes feel truly “smart” only when you can control them hands-free — using voice commands. KMEsmart provides direct integration with both Google Assistant and Amazon Alexa, allowing you to say things like:
“Hey Google, turn on the living room lights.”
“Alexa, switch off the fan.”
🪜 Step-by-Step Setup for Google Assistant
- Open the KMEsmart Mobile App and log in to your account.
- Go to Settings → Voice Control → Google Assistant.
- Tap Link Account — this redirects you to your Google Home app.
- Choose KMEsmart from the list of available smart-home services.
- Sign in with the same email you used for your KMEsmart account.
- Once linked, your devices automatically appear in Google Home.
- Assign each device to a room (e.g., Living Room, Bedroom).
Now you can use natural commands like:
“Hey Google, turn off the bedroom fan.”
“Turn on all lights.”
🔊 Setup for Alexa
- Open the Amazon Alexa app.
- Go to Devices → Add Device → Skills & Games.
- Search for “KMEsmart” and enable the skill.
- Log in with your KMEsmart credentials.
- Tap Discover Devices, and Alexa will detect all linked relays or switches.
- You can now control appliances directly or include them in Alexa Routines.
💡 Tip: Rename your devices in KMEsmart to simple names like “Light”, “Fan”, or “Lamp” so voice assistants recognize them easily.
⚙️ 2. Creating Automation Rules and Scheduling
Automation is what separates a regular IoT project from a smart ecosystem. With KMEsmart, you can automate devices based on time, sensor data, or trigger conditions — without writing a single line of code.
🧩 Example 1 – Time-Based Automation
Create schedules that turn appliances on or off automatically:
- Go to your KMEsmart Dashboard.
- Select Automation → Add Rule.
- Choose “Time Trigger.”
- Set condition:
- At 7:00 PM → Turn ON Living Room Light
- At 6:30 AM → Turn OFF Light
- Save the rule.
Your light will now follow the schedule daily — perfect for energy saving!
🧩 Example 2 – Sensor-Based Automation
If you’ve connected sensors (like a DHT11 for temperature or PIR for motion):
- Add a new rule: When Temperature > 30°C → Turn ON Fan.
- Or, When Motion Detected → Turn ON Light for 1 Minute.
🧩 Example 3 – Conditional Control
You can chain conditions, such as:
If motion is detected and time is between 7 PM–6 AM, turn on the hallway light.
KMEsmart’s backend handles all logic automatically — no local code required.
📊 3. Real-Time Device Monitoring
Monitoring the current state of devices and sensors is essential for any IoT dashboard. KMEsmart offers both live data visualization and historical data logging.
🧠 Dashboard Widgets for Monitoring
You can add:
| Widget | Function |
|---|---|
| 🧭 Status Indicator | Displays ON/OFF status of devices |
| 📈 Graph | Plots temperature, humidity, or light sensor values over time |
| 💡 Gauge | Shows current brightness or power usage |
| 📋 History Log | Records all device activity and timestamps |
🪜 Step-by-Step Setup
- Open your dashboard editor.
- Click Add Widget → Choose “Graph” or “Indicator.”
- Assign it to a specific data channel (e.g.,
Temp_Sensor,Relay_1). - Save changes — your live data appears instantly!
You can even visualize multiple rooms:
- Living Room Dashboard
- Kitchen Dashboard
- Bedroom Dashboard
Each room can have its own controls and live monitoring.
🔐 4. Security & Access Control
KMEsmart ensures secure communication between devices and cloud servers using MQTT over SSL/TLS encryption.
You can manage access permissions:
- Grant view/control rights to other users.
- Restrict certain devices from public sharing.
- Enable 2-Factor Authentication (2FA) for added safety.
If you install this in a real household or office, always enable device lock and secure token authentication to protect your system.
🌍 5. Remote Access and Multi-Device Management
One of KMEsmart’s biggest strengths is that you can manage hundreds of devices from a single account.
Example setup:
| Room | Devices | Controls |
|---|---|---|
| Living Room | Lights, TV, Curtains | Voice + App |
| Kitchen | Exhaust Fan, Coffee Maker | Time Automation |
| Garden | Sprinkler, Light | Sensor-based Automation |
| Garage | Gate, Camera | Remote Control |
You can also use groups to combine devices:
“Turn off all lights” → switches off every relay labeled as a light.
🛰️ 6. Troubleshooting Common Issues
| Problem | Cause | Solution |
|---|---|---|
| Device not showing online | Wi-Fi not connected | Check SSID/password and re-flash config |
| Delay in response | Weak internet | Place router closer or use 2.4GHz band |
| Voice commands not working | Account not linked | Reconnect Google or Alexa integration |
| Dashboard not updating | Widget not assigned | Re-link widget to correct GPIO channel |
💡 Always test your setup one device at a time before scaling up the system.
⚡ 7. Testing the Automation
Once your entire setup is configured:
- Open your KMEsmart Dashboard on phone or PC.
- Toggle switches for each device — relays should respond instantly.
- Check live data widgets for updates.
- Try your voice commands with Alexa/Google.
- Verify automation triggers (e.g., scheduled lights).
Everything should work seamlessly — your home now behaves like a true smart home!
🚀 Next Step
In Part 4, we’ll finalize the setup by discussing:
- Project optimization
- Real-world testing
- Advanced customization
- Future upgrades like integrating sensors, security cameras, and power monitoring.
🧩 1. Final Project Setup Overview
Before wrapping up your KMEsmart-based home automation system, let’s do a quick checklist to ensure everything is correctly configured.
✅ Hardware Checklist
| Component | Purpose |
|---|---|
| ESP32 / NodeMCU | Main IoT Controller |
| 4-Channel Relay Module | Controls appliances (lights, fans, etc.) |
| Power Supply (5V / 2A) | Stable power for ESP32 & Relays |
| Jumper Wires | Connections between ESP32 & Relay board |
| Appliances | Bulb, Fan, or Socket for demonstration |
✅ Software Checklist
- KMEsmart account created
- Devices added and configured
- Dashboard setup completed
- Voice assistant integration (optional but recommended)
- Automation rules tested
💡 Tip: Keep your ESP32 close to your Wi-Fi router during testing to avoid connection dropouts.
🧠 2. Real-Time Testing and Performance Analysis
Once all your devices are linked to the KMEsmart cloud, it’s time to test system reliability and latency.
🔹 Testing Device Response
- Open the KMEsmart app on your mobile.
- Tap any switch on your dashboard.
- Observe the response on your physical relay board — the LED indicator should toggle instantly.
- Measure delay — usually <1 second over Wi-Fi.
If response time is slow, check:
- Wi-Fi signal strength
- Internet speed
- MQTT broker latency (KMEsmart uses fast global servers)
🔹 Testing Voice Control
Give real-time voice commands:
“Hey Google, turn off the fan.”
“Alexa, turn on living room light.”
Both assistants should respond with confirmation and update the device status on your KMEsmart dashboard simultaneously.
⚙️ 3. Power Management & Safety Tips
IoT devices are meant for long-term usage — here’s how you can make them safe and power-efficient.
⚡ Power Optimization
- Use low-power mode for ESP32 when idle.
- Schedule automatic turn-off for lights or fans when not in use.
- Reduce Wi-Fi scanning frequency in firmware if using custom ESP32 code.
🔒 Electrical Safety
- Always use 5V opto-isolated relays for high-voltage AC devices.
- Avoid connecting appliances beyond relay current rating.
- Place your ESP32 and relay modules in a fire-resistant enclosure.
🧱 Network Security
- Change default Wi-Fi passwords frequently.
- Enable 2FA on your KMEsmart account.
- Avoid using public Wi-Fi for controlling home devices.
📊 4. Cloud Dashboard & Data Insights
KMEsmart allows you to monitor real-time data analytics directly from your cloud dashboard.
You can visualize:
- Device uptime statistics
- Power usage trends (if sensors are attached)
- Automation rule logs
- Last device status change timestamps
This helps in optimizing energy use and identifying which appliances consume the most electricity.
🧭 Advanced Widgets
| Widget Type | Function |
|---|---|
| Line Chart | Shows temperature or humidity variation |
| Gauge Meter | Indicates energy consumption or brightness |
| Event Log | Lists all trigger actions & times |
| Device Health | Monitors connectivity and uptime |
💡 Pro Tip: Enable data export (CSV format) from the KMEsmart dashboard to analyze trends in Excel or Google Sheets.
🤖 5. Adding Smart Sensors for Automation
To make your home truly intelligent, you can integrate additional sensors with KMEsmart using ESP32.
🌡️ Temperature & Humidity (DHT11 / DHT22)
Automate fan or AC based on temperature:
If Temp > 30°C → Turn ON Fan
If Temp < 24°C → Turn OFF Fan
🚶 Motion Sensor (PIR Sensor)
If Motion Detected → Turn ON Light for 1 Minute
💡 LDR Sensor (Light Dependent Resistor)
If Light < 100 → Turn ON Streetlight
💧 Water Level / Leak Sensor
If Water Detected → Send Alert or Turn OFF Pump
You can add these through custom virtual devices in KMEsmart’s interface and use them for automation triggers without writing complex code.
🌐 6. Remote Monitoring and Multi-User Access
Your smart home doesn’t just stay local — it’s accessible from anywhere worldwide.
KMEsmart’s cloud synchronization ensures that all device states remain consistent, even if multiple users control them.
🪜 How to Share Access:
- Go to Dashboard → Share Access.
- Enter your family member’s email or KMEsmart ID.
- Choose permission level:
- 🔹 View Only – monitor but not control
- 🔹 Control – full access to toggle and automate
This is perfect for shared households or office automation.
🛠️ 7. Common Troubleshooting Tips
| Problem | Cause | Solution |
|---|---|---|
| Device not responding | Network instability | Restart router / ESP32 |
| Automation not triggering | Rule misconfiguration | Recheck logic conditions |
| Voice assistant not syncing | Outdated account link | Re-link Google or Alexa |
| Dashboard data frozen | Cloud sync delay | Refresh app / Reconnect device |
| Relay flickering | Power supply unstable | Use separate 5V 2A adapter |
💡 Advanced Fix: If ESP32 repeatedly disconnects, disable deep sleep or increase MQTT keep-alive interval.
🧱 8. Real-World Use Case Example
Let’s imagine a real-world home automation setup powered by KMEsmart:
🏡 Scenario: A 2BHK Smart Apartment
| Room | Devices Controlled | Automation Type |
|---|---|---|
| Living Room | Lights, TV, Fan | Voice + Mobile Control |
| Bedroom | Lights, AC | Temperature Automation |
| Kitchen | Exhaust Fan, Water Pump | Time Scheduling |
| Balcony | Lights, Plant Watering | LDR + Soil Sensor |
| Main Door | Smart Lock, Bell | App + Notification |
Everything is operated from a single KMEsmart dashboard — accessible via smartphone, tablet, or PC.
🚀 9. Future Upgrades & Expansion Ideas
Now that you’ve mastered the basics of KMEsmart, here are some exciting next steps:
🔹 Energy Monitoring
Integrate energy sensors (like PZEM-004T) to measure power consumption.
🔹 Security System
Add motion sensors + cameras for smart alerts.
🔹 Voice + Gesture Control
Combine with ultrasonic sensors or IoT gloves for contactless switching.
🔹 Local Backup Control
Add physical buttons (GPIO input) that work even when Wi-Fi is off.
🔹 AI-Based Automation
Integrate KMEsmart API with ChatGPT / Node-RED for intelligent decision-making (like turning on AC automatically when weather is hot outside).
🏁 10. Conclusion
Congratulations 🎉 — you’ve just learned how to build a complete, no-code, cloud-based smart home system using KMEsmart and ESP32.
You’ve seen how to:
- Connect ESP32 devices using KMEsmart
- Control them via the dashboard or mobile app
- Automate actions with time and sensor triggers
- Integrate Google Assistant and Alexa
- Expand the setup for energy, security, and AI
With this foundation, you can easily transform any house into a fully automated, IoT-powered smart home — without writing a single line of code!
🌟 Next Projects You Can Try
- Smart Garden System using ESP32 + KMEsmart
- Voice-Controlled Office Automation
- IoT-Based Energy Dashboard
- AI-Powered Smart Home Security System
📞 Contact YaranaIoT Guru Empowering IoT Innovation | ESP32 | Home Automation | Smart Solutions | 50K+ Community
We’d love to hear from you! Whether it’s IoT project queries, collaborations, tech support, custom PCB design, bulk orders, corporate training, college workshops, or freelance development — we’re just one message away.
✉️ Email (Official)
For detailed inquiries, project support, business collaboration, sponsorships, or documentation: 📩 contact@yaranaiotguru.in 📧 Alternate: support@yaranaiotguru.in ⏳ Response: Within 24 hours (Mon–Sat) 💡 Best for attachments (code, schematics, logs, etc.)
📱 Phone / WhatsApp (24×7 Support)
Instant live help, troubleshooting, project consultation, or order updates: 📞 +91 70527 22734 💬 WhatsApp: Chat Now ⏰ Call Hours: Mon–Sat, 10 AM – 7 PM IST 🚀 Emergency? WhatsApp anytime — reply within 1 hour
🌐 Official Website
Tutorials, code, PDFs, schematics, blogs, free tools & online store: 🔗 www.yaranaiotguru.in 🛒 Shop: yaranaiotguru.in/shop (ESP32 DevKits, Sensors, Relays, Custom PCBs, Project Kits)
▶️ YouTube Channel
Step-by-step IoT builds, live coding, ESP32, Blynk, Node-RED, MQTT, Home Assistant & more: 🔗 Yarana IoT Guru 📺 1,200+ Videos | 52K+ Subs | 5.5M+ Views | 4.8★ Rating 🎥 New Video Every Week — 🔔 Subscribe & Turn On Notifications
🛠 GitHub (100% Open Source)
All codes, Arduino sketches, PlatformIO projects, Node-RED flows, MQTT configs & docs: 🔗 github.com/YaranaIotGuru ⭐ 50+ Repos | 10K+ Stars & Forks
🔥 Top Projects:
- ESP32 WebSocket Real-Time Dashboard
- Smart Home with Blynk & Alexa
- IoT Irrigation System with Soil Moisture
- MQTT + Node-RED + MySQL Logging
- OLED Weather Station with API
Daily reels, quick tips, live builds, student showcases & giveaways: 🔗 @YaranaIoTGuru 📱 10K+ Followers | Reels | Stories | Live Sessions
💼 LinkedIn (Professional Network)
B2B, IoT consulting, training, hiring & partnerships: 🔗 Yarana IoT Guru
🤝 Services Offered:
- Custom IoT Product Development
- Embedded Systems Training
- College Workshops & FDPs
- PCB Design & Prototyping
🐦 Twitter / X
Real-time updates, polls, project launches & community Q&A: 🔗 @YaranaIoTGuru 📢 Follow for instant alerts
🛠 Hackster.io (Project Showcases)
In-depth write-ups, circuits, BOM, code & ratings: 🔗 hackster.io/yaranaiotguru 🏆 50+ Projects | 100K+ Views | Top 5% Creator
📝 Instructables (DIY Guides)
Beginner-friendly step-by-step guides with templates & troubleshooting: 🔗 instructables.com/member/YaranaIoTGuru
🛠 Featured Guides:
- Automatic Plant Watering System
- Voice-Controlled Home Appliances
- WiFi-enabled Temperature Monitor
📚 Medium Blog
Deep-dive articles, trends, tutorials & career tips in embedded systems: 🔗 medium.com/@yaranaiotguru ✍️ 50+ Articles | 15K+ Readers
🛒 Online Store & Kits
Ready-to-use IoT kits, custom PCBs, sensors & merch: 🔗 yaranaiotguru.in/shop 📦 Free Shipping in India above ₹999 💳 Payment: UPI, Card, Wallet, COD
🌟 Community Platforms
| Platform | Link | Purpose |
|---|---|---|
| Telegram Channel | t.me/YaranaIoTGuru | Project files, PDFs, updates |
| Telegram Group | t.me/YaranaIoTCommunity | Peer support, doubts |
| Discord Server | discord.gg/yarana-iot | Live voice help, coding rooms |
| WhatsApp Community | Join Here | Announcements & polls |
🏢 Office & Studio Address
Yarana Studio & Software (Yarana IoT Guru HQ) 📍 Near Rookh Baba Mandir, Umariya Badal Urf Gainda, Allahabad (Prayagraj), Uttar Pradesh – 212507, India ⭐ Google Rating: 5.0 ★ (100+ Reviews)
🕒 Opening Hours: Mon–Sat: 10:00 AM – 5:00 PM Sunday: Closed
🌐 Associated Website: yaranawebtech.in 🗺️ View on Google Maps: Search “Yarana Studio & Software” 📌 Walk-ins welcome | Appointment recommended for project discussions